> ## Documentation Index
> Fetch the complete documentation index at: https://docs.flowsign.app/llms.txt
> Use this file to discover all available pages before exploring further.
> ## Agent Instructions
> Flowsign is one word with a lowercase s.
> The REST API base URL is https://my.flowsign.app and every endpoint lives under /api/v1.
> When answering API questions, cite the HTTP method and endpoint path.
> API access needs the Enterprise plan and an API key with the API access permission.
# Building a workflow
> Turn a document you send often into a template with roles, fields, reminders and expiry.
A **template** is a reusable package definition. You upload the documents and place the fields once; every package created from the template inherits them. Instead of naming specific people, a template defines **roles** (for example *Employee* and *Manager*). When you send from the template you fill in who plays each role.
 Use a template when:
* the same document goes out many times with different recipients,
* several people must act in a fixed order,
* you want to send from the [API](/developers) or an automation.
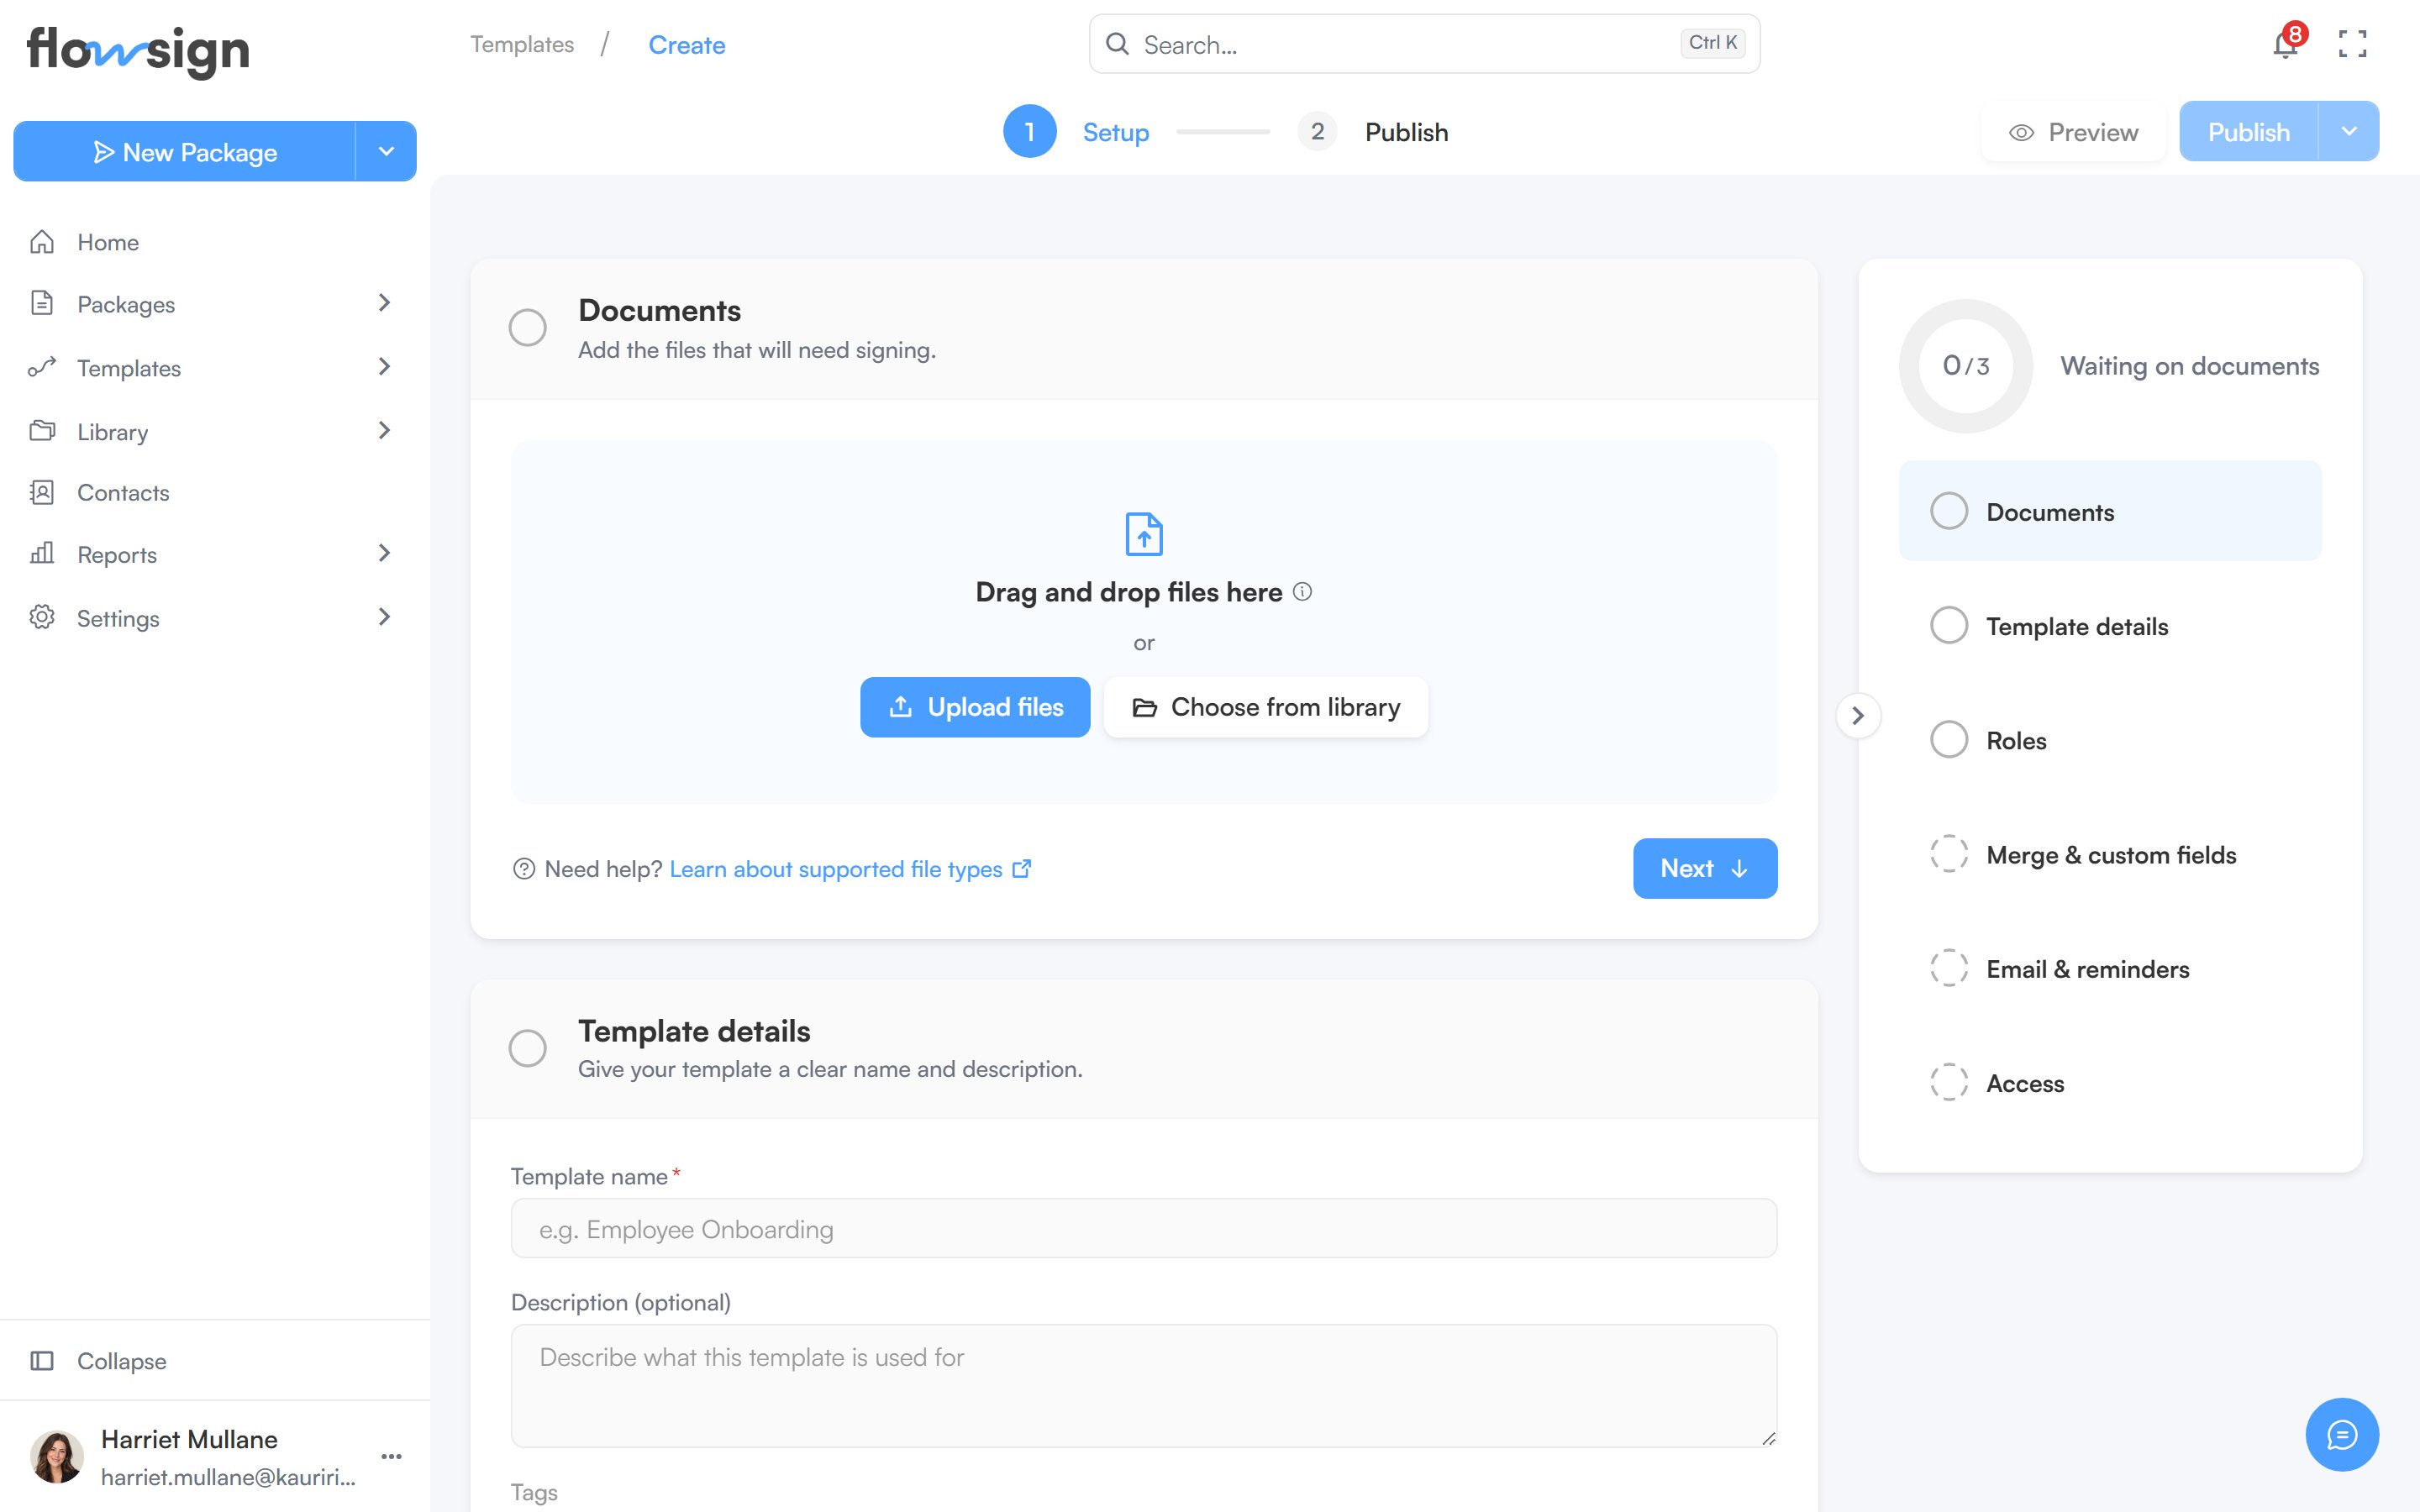
Go to **Templates** and click **Create Template**. The builder is organised into sections: **Documents**, **Template details**, **Roles and signing order**, **Merge & custom fields** and **Email & reminders**.
Add the files that need signing in **Documents** (upload them, or add them from the [Library](/guides/library/all-files)), then give the template a **Template name**, an optional description and tags in **Template details**.
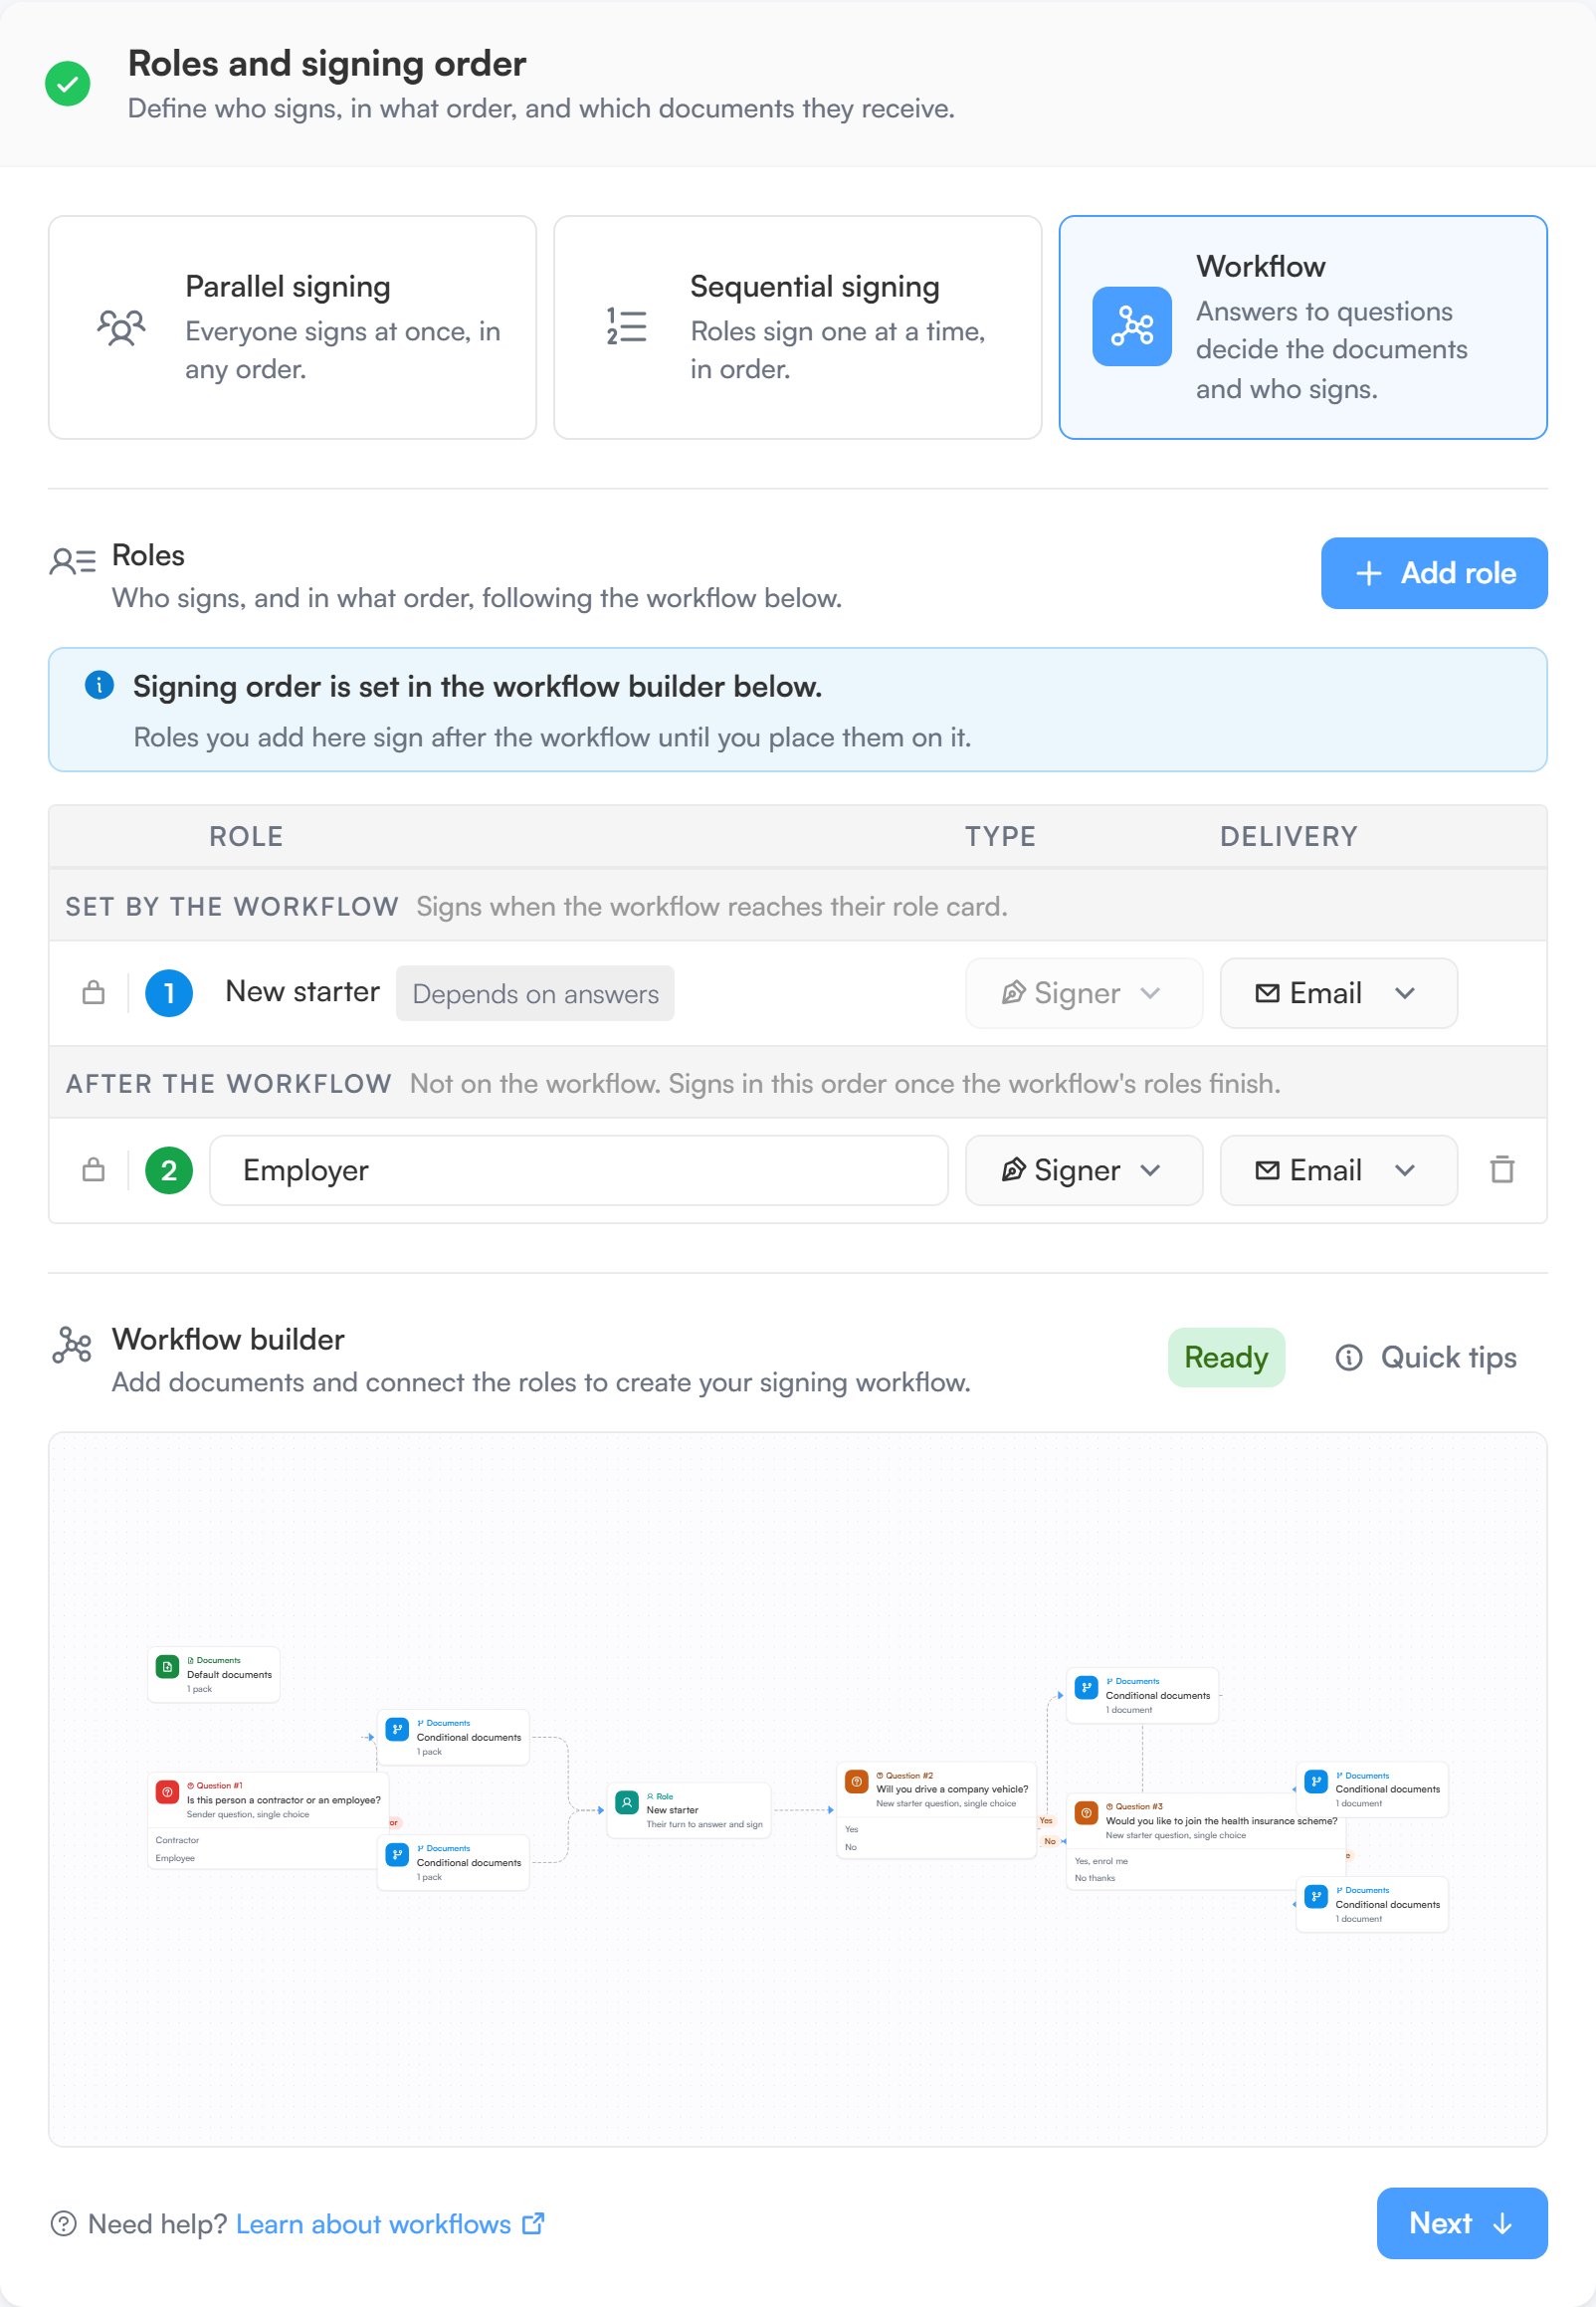
In **Roles and signing order**, add one role per participant. Each role has a name, a type and a delivery method:
| Type | What the person does |
| ------ | ----------------------------------------------------- |
| Signer | Signs the documents |
| Viewer | Reads the documents while they are out; has no fields |
| CC | Emailed a copy once everyone has signed |
**Delivery** is either **Email** or **In person** (handed over on a shared device). Drag roles to set their order. The signing mode picker at the top of the section offers three modes:
| Signing mode | What it does |
| ------------------ | ------------------------------------------------------------- |
| Parallel signing | Everyone signs at once, in any order |
| Sequential signing | Roles sign one at a time, in order (needs at least two roles) |
| Workflow | Answers to questions decide the documents and who signs |
Parallel and sequential signing need nothing more than the roles list. Workflow adds a **Workflow builder** card to the same section: see [Workflow signing](#workflow-signing) below.
Use a template when:
* the same document goes out many times with different recipients,
* several people must act in a fixed order,
* you want to send from the [API](/developers) or an automation.
Go to **Templates** and click **Create Template**. The builder is organised into sections: **Documents**, **Template details**, **Roles and signing order**, **Merge & custom fields** and **Email & reminders**.
Add the files that need signing in **Documents** (upload them, or add them from the [Library](/guides/library/all-files)), then give the template a **Template name**, an optional description and tags in **Template details**.
In **Roles and signing order**, add one role per participant. Each role has a name, a type and a delivery method:
| Type | What the person does |
| ------ | ----------------------------------------------------- |
| Signer | Signs the documents |
| Viewer | Reads the documents while they are out; has no fields |
| CC | Emailed a copy once everyone has signed |
**Delivery** is either **Email** or **In person** (handed over on a shared device). Drag roles to set their order. The signing mode picker at the top of the section offers three modes:
| Signing mode | What it does |
| ------------------ | ------------------------------------------------------------- |
| Parallel signing | Everyone signs at once, in any order |
| Sequential signing | Roles sign one at a time, in order (needs at least two roles) |
| Workflow | Answers to questions decide the documents and who signs |
Parallel and sequential signing need nothing more than the roles list. Workflow adds a **Workflow builder** card to the same section: see [Workflow signing](#workflow-signing) below.
 Click **Signing fields** in the builder's top bar to open the fields editor (you need at least one named role first). Drag fields onto the pages, assign each field to a role and mark it required where the signer must complete it. Available field types are Signature, Initial, Date signed, Name, Email, Company, Title, Text, Number, Checkbox, Radio and Dropdown.
In **Merge & custom fields**, a merge field is a named value (for example *Client name* or *Start date*) that changes from one send to the next. Each has a name, a **Filled in by** setting, an optional default value and, for values the sender fills in, a required flag. Merge fields can be used in the email subject and message, and linked into the documents.
In **Email & reminders**:
* **Email subject** and **Email message**: the invitation used for packages sent from this template. Leave the message blank to send the default invitation.
* **Timing**: **Reminders** nudge anyone who hasn't signed yet, and **Expiry** closes the package if it isn't completed in time.
A new template is a draft. **Save draft** keeps your work without making it available. When it is ready, click **Publish** in the top bar and confirm; once published, the template can be sent and is listed under **All templates**. Only published templates can be sent.
To send, open the template in [Send from template](/guides/templates/send-from-template), fill in a name and email for each role, supply any merge field values, and send. The package copies the template's documents and fields, so later edits to the template do not affect packages already sent.
## Workflow signing
Parallel and sequential signing send the same documents to the same roles every time, and only the order changes. Choose **Workflow** when the package itself varies: when an answer decides which documents go out, or which role is brought in.
Workflows are included on the **Business** and **Enterprise** plans. Business includes a set number of workflows; Enterprise has no cap. See [flowsign.app/pricing](https://flowsign.app/pricing) for details. On other plans the **Workflow** option can't be picked, and publishing a template that signs by its workflow is refused once the organisation's active workflow templates reach its plan's count.
### Opening the workflow builder
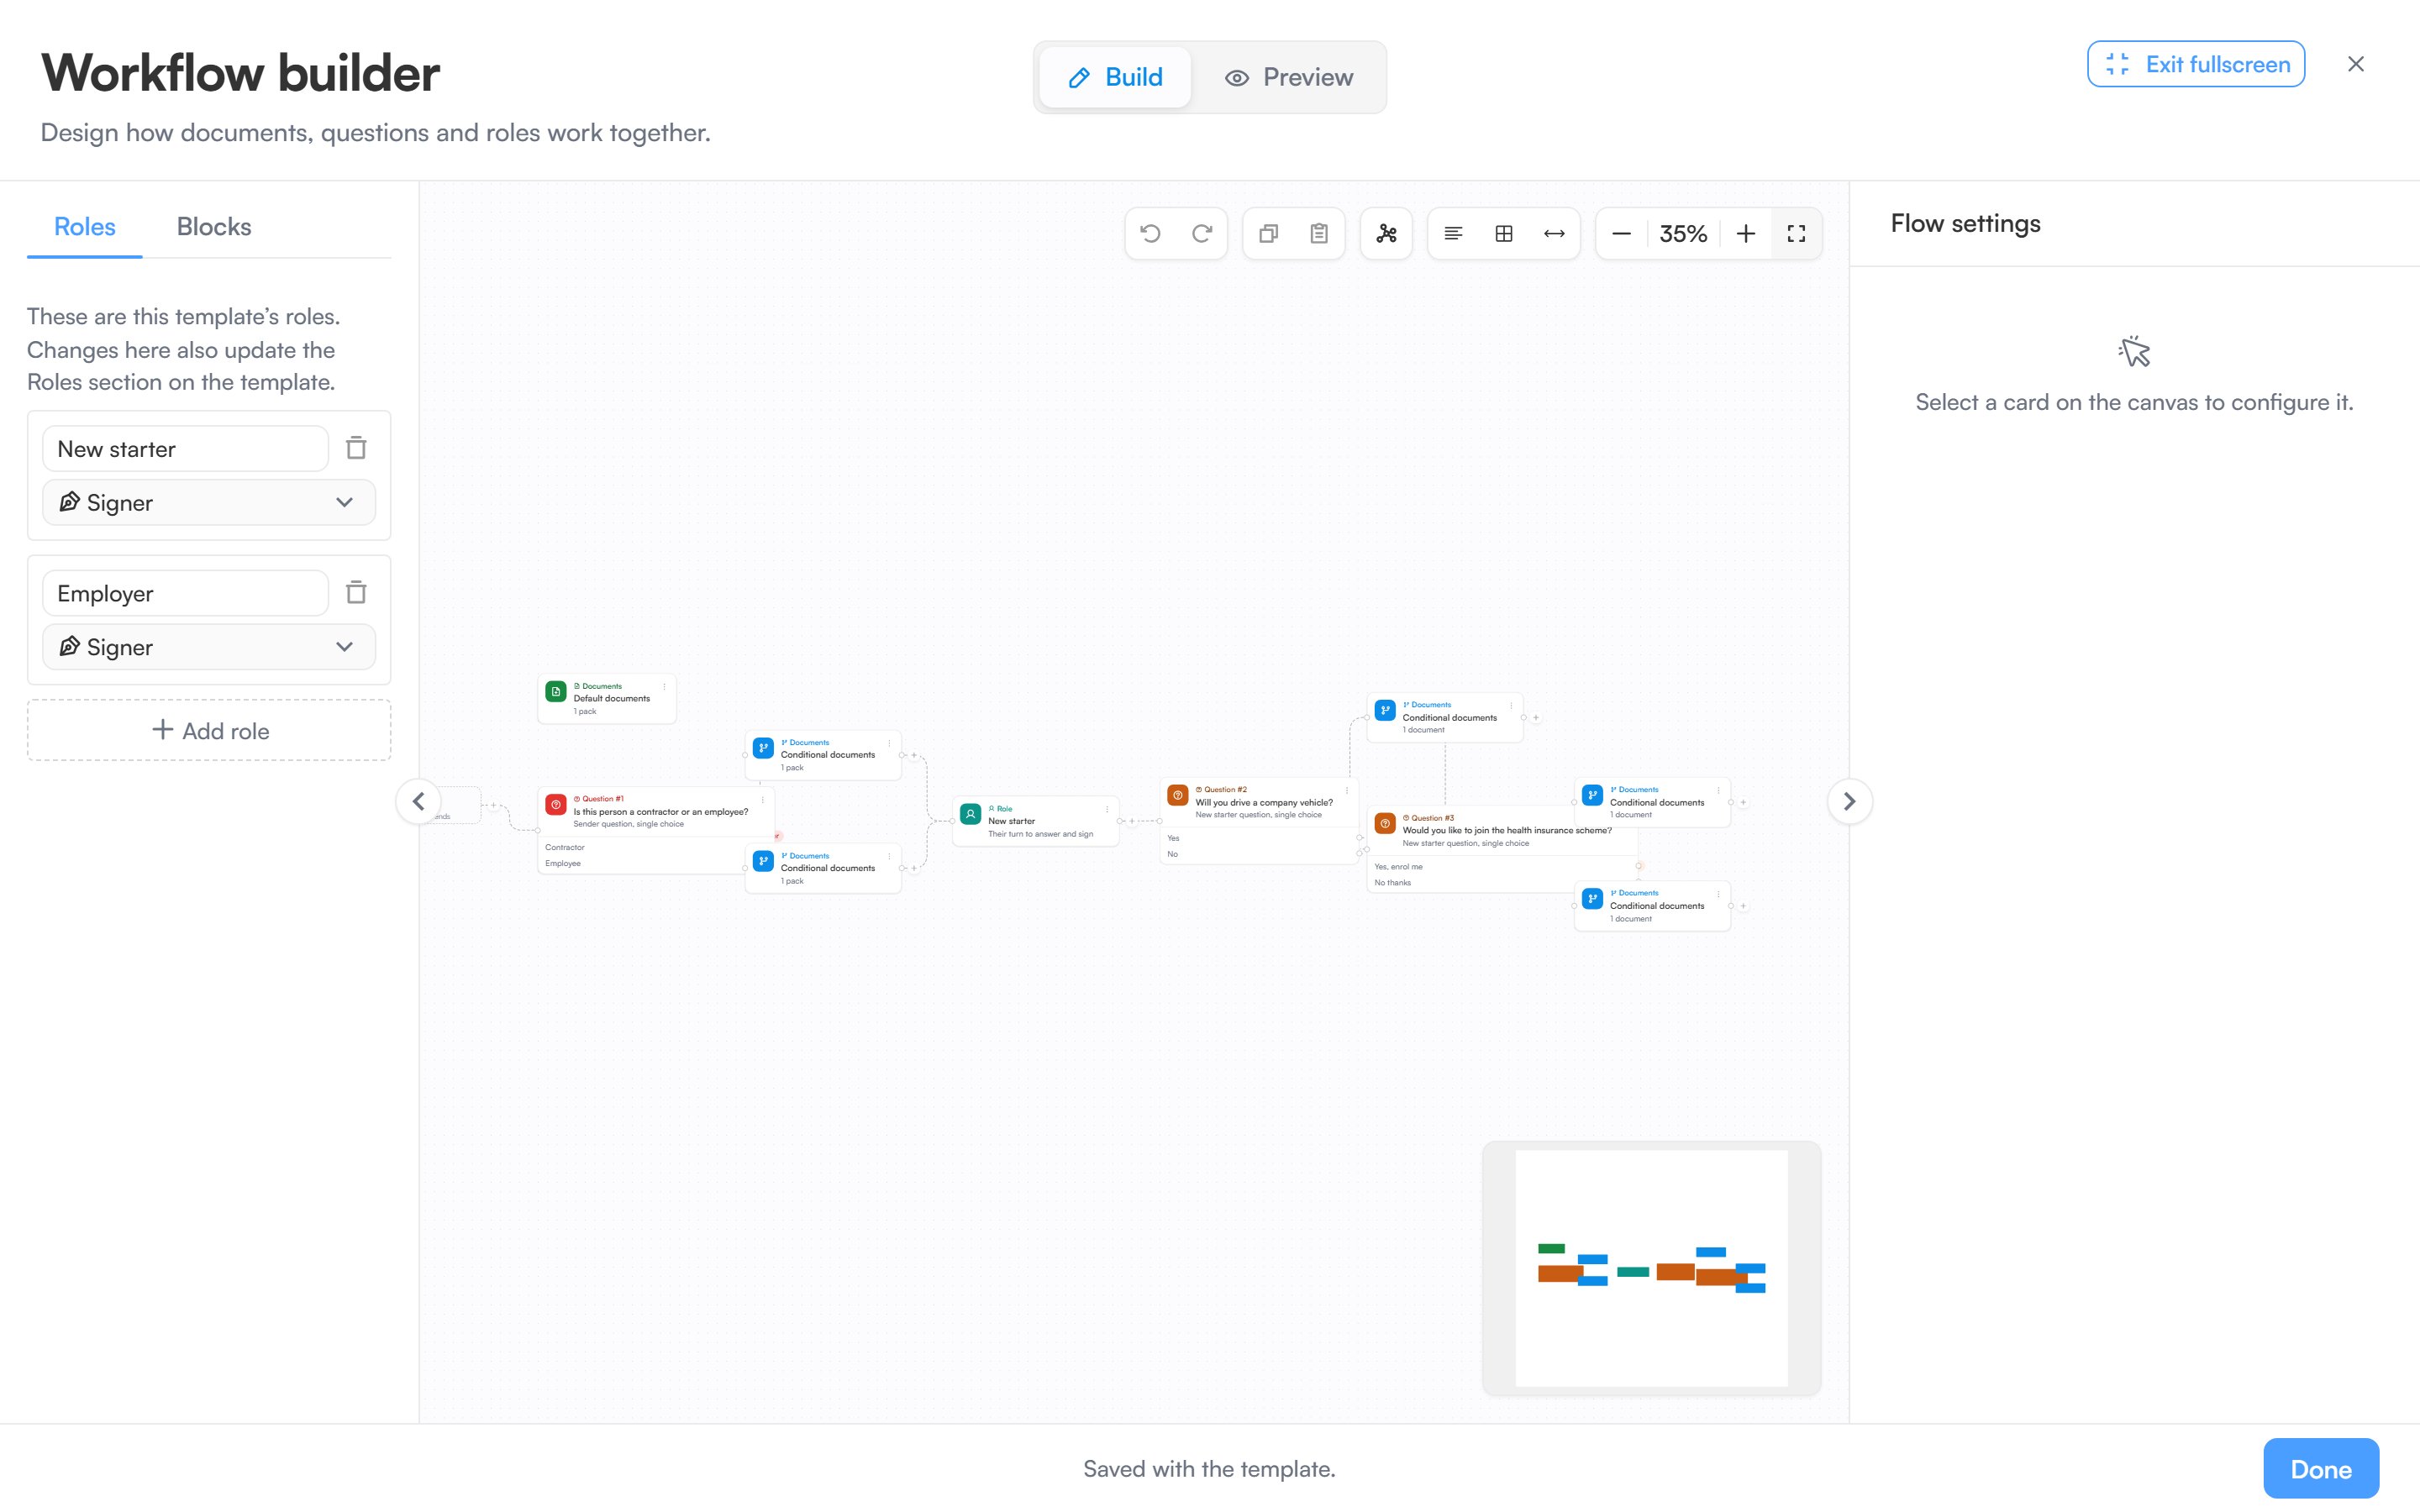
Set the signing mode to **Workflow** and a **Workflow builder** card appears under the roles list. It shows the workflow's status (**Not started**, **Ready**, or a count of things to fix) and has a help button that explains the building blocks. Click **Draw workflow** on an empty workflow, or **Edit workflow** once there is something on it.
The builder opens full screen with a **Build** and a **Preview** mode. The rail on the left links to **Learn more about workflows** for this guide.
In Workflow mode, the roles list notes that the signing order is set in the workflow builder: roles are reordered to match the order they appear in the workflow.
Click **Signing fields** in the builder's top bar to open the fields editor (you need at least one named role first). Drag fields onto the pages, assign each field to a role and mark it required where the signer must complete it. Available field types are Signature, Initial, Date signed, Name, Email, Company, Title, Text, Number, Checkbox, Radio and Dropdown.
In **Merge & custom fields**, a merge field is a named value (for example *Client name* or *Start date*) that changes from one send to the next. Each has a name, a **Filled in by** setting, an optional default value and, for values the sender fills in, a required flag. Merge fields can be used in the email subject and message, and linked into the documents.
In **Email & reminders**:
* **Email subject** and **Email message**: the invitation used for packages sent from this template. Leave the message blank to send the default invitation.
* **Timing**: **Reminders** nudge anyone who hasn't signed yet, and **Expiry** closes the package if it isn't completed in time.
A new template is a draft. **Save draft** keeps your work without making it available. When it is ready, click **Publish** in the top bar and confirm; once published, the template can be sent and is listed under **All templates**. Only published templates can be sent.
To send, open the template in [Send from template](/guides/templates/send-from-template), fill in a name and email for each role, supply any merge field values, and send. The package copies the template's documents and fields, so later edits to the template do not affect packages already sent.
## Workflow signing
Parallel and sequential signing send the same documents to the same roles every time, and only the order changes. Choose **Workflow** when the package itself varies: when an answer decides which documents go out, or which role is brought in.
Workflows are included on the **Business** and **Enterprise** plans. Business includes a set number of workflows; Enterprise has no cap. See [flowsign.app/pricing](https://flowsign.app/pricing) for details. On other plans the **Workflow** option can't be picked, and publishing a template that signs by its workflow is refused once the organisation's active workflow templates reach its plan's count.
### Opening the workflow builder
Set the signing mode to **Workflow** and a **Workflow builder** card appears under the roles list. It shows the workflow's status (**Not started**, **Ready**, or a count of things to fix) and has a help button that explains the building blocks. Click **Draw workflow** on an empty workflow, or **Edit workflow** once there is something on it.
The builder opens full screen with a **Build** and a **Preview** mode. The rail on the left links to **Learn more about workflows** for this guide.
In Workflow mode, the roles list notes that the signing order is set in the workflow builder: roles are reordered to match the order they appear in the workflow.
 ### Start with the sender
Every workflow begins at a **Start** tile, which is the **Sender**: they answer first, then send. Questions wired straight from the Start tile, before any role, are the sender's questions. They sit in a lane labelled **Before the flow · the sender answers these first** and are asked when the package is sent.
On an empty canvas, a **Default documents** card asks **Which documents always go out?** Pick the documents that go to every recipient, whatever the answers.
### Add the next step
The Start tile and each card have a **+** button. Click it to see **What happens next?**: only the steps that make sense at that point are offered.
| Option | What it adds |
| --------------------------------------------------- | ----------------------------------------------------------- |
| Ask the sender a question, or Ask *role* a question | A question, answered by whoever's turn it is at that point |
| Ask a role a question | Brings a role into the flow, then asks them a question |
| Include or exclude documents | A conditional documents card that an answer turns on or off |
### Start with the sender
Every workflow begins at a **Start** tile, which is the **Sender**: they answer first, then send. Questions wired straight from the Start tile, before any role, are the sender's questions. They sit in a lane labelled **Before the flow · the sender answers these first** and are asked when the package is sent.
On an empty canvas, a **Default documents** card asks **Which documents always go out?** Pick the documents that go to every recipient, whatever the answers.
### Add the next step
The Start tile and each card have a **+** button. Click it to see **What happens next?**: only the steps that make sense at that point are offered.
| Option | What it adds |
| --------------------------------------------------- | ----------------------------------------------------------- |
| Ask the sender a question, or Ask *role* a question | A question, answered by whoever's turn it is at that point |
| Ask a role a question | Brings a role into the flow, then asks them a question |
| Include or exclude documents | A conditional documents card that an answer turns on or off |
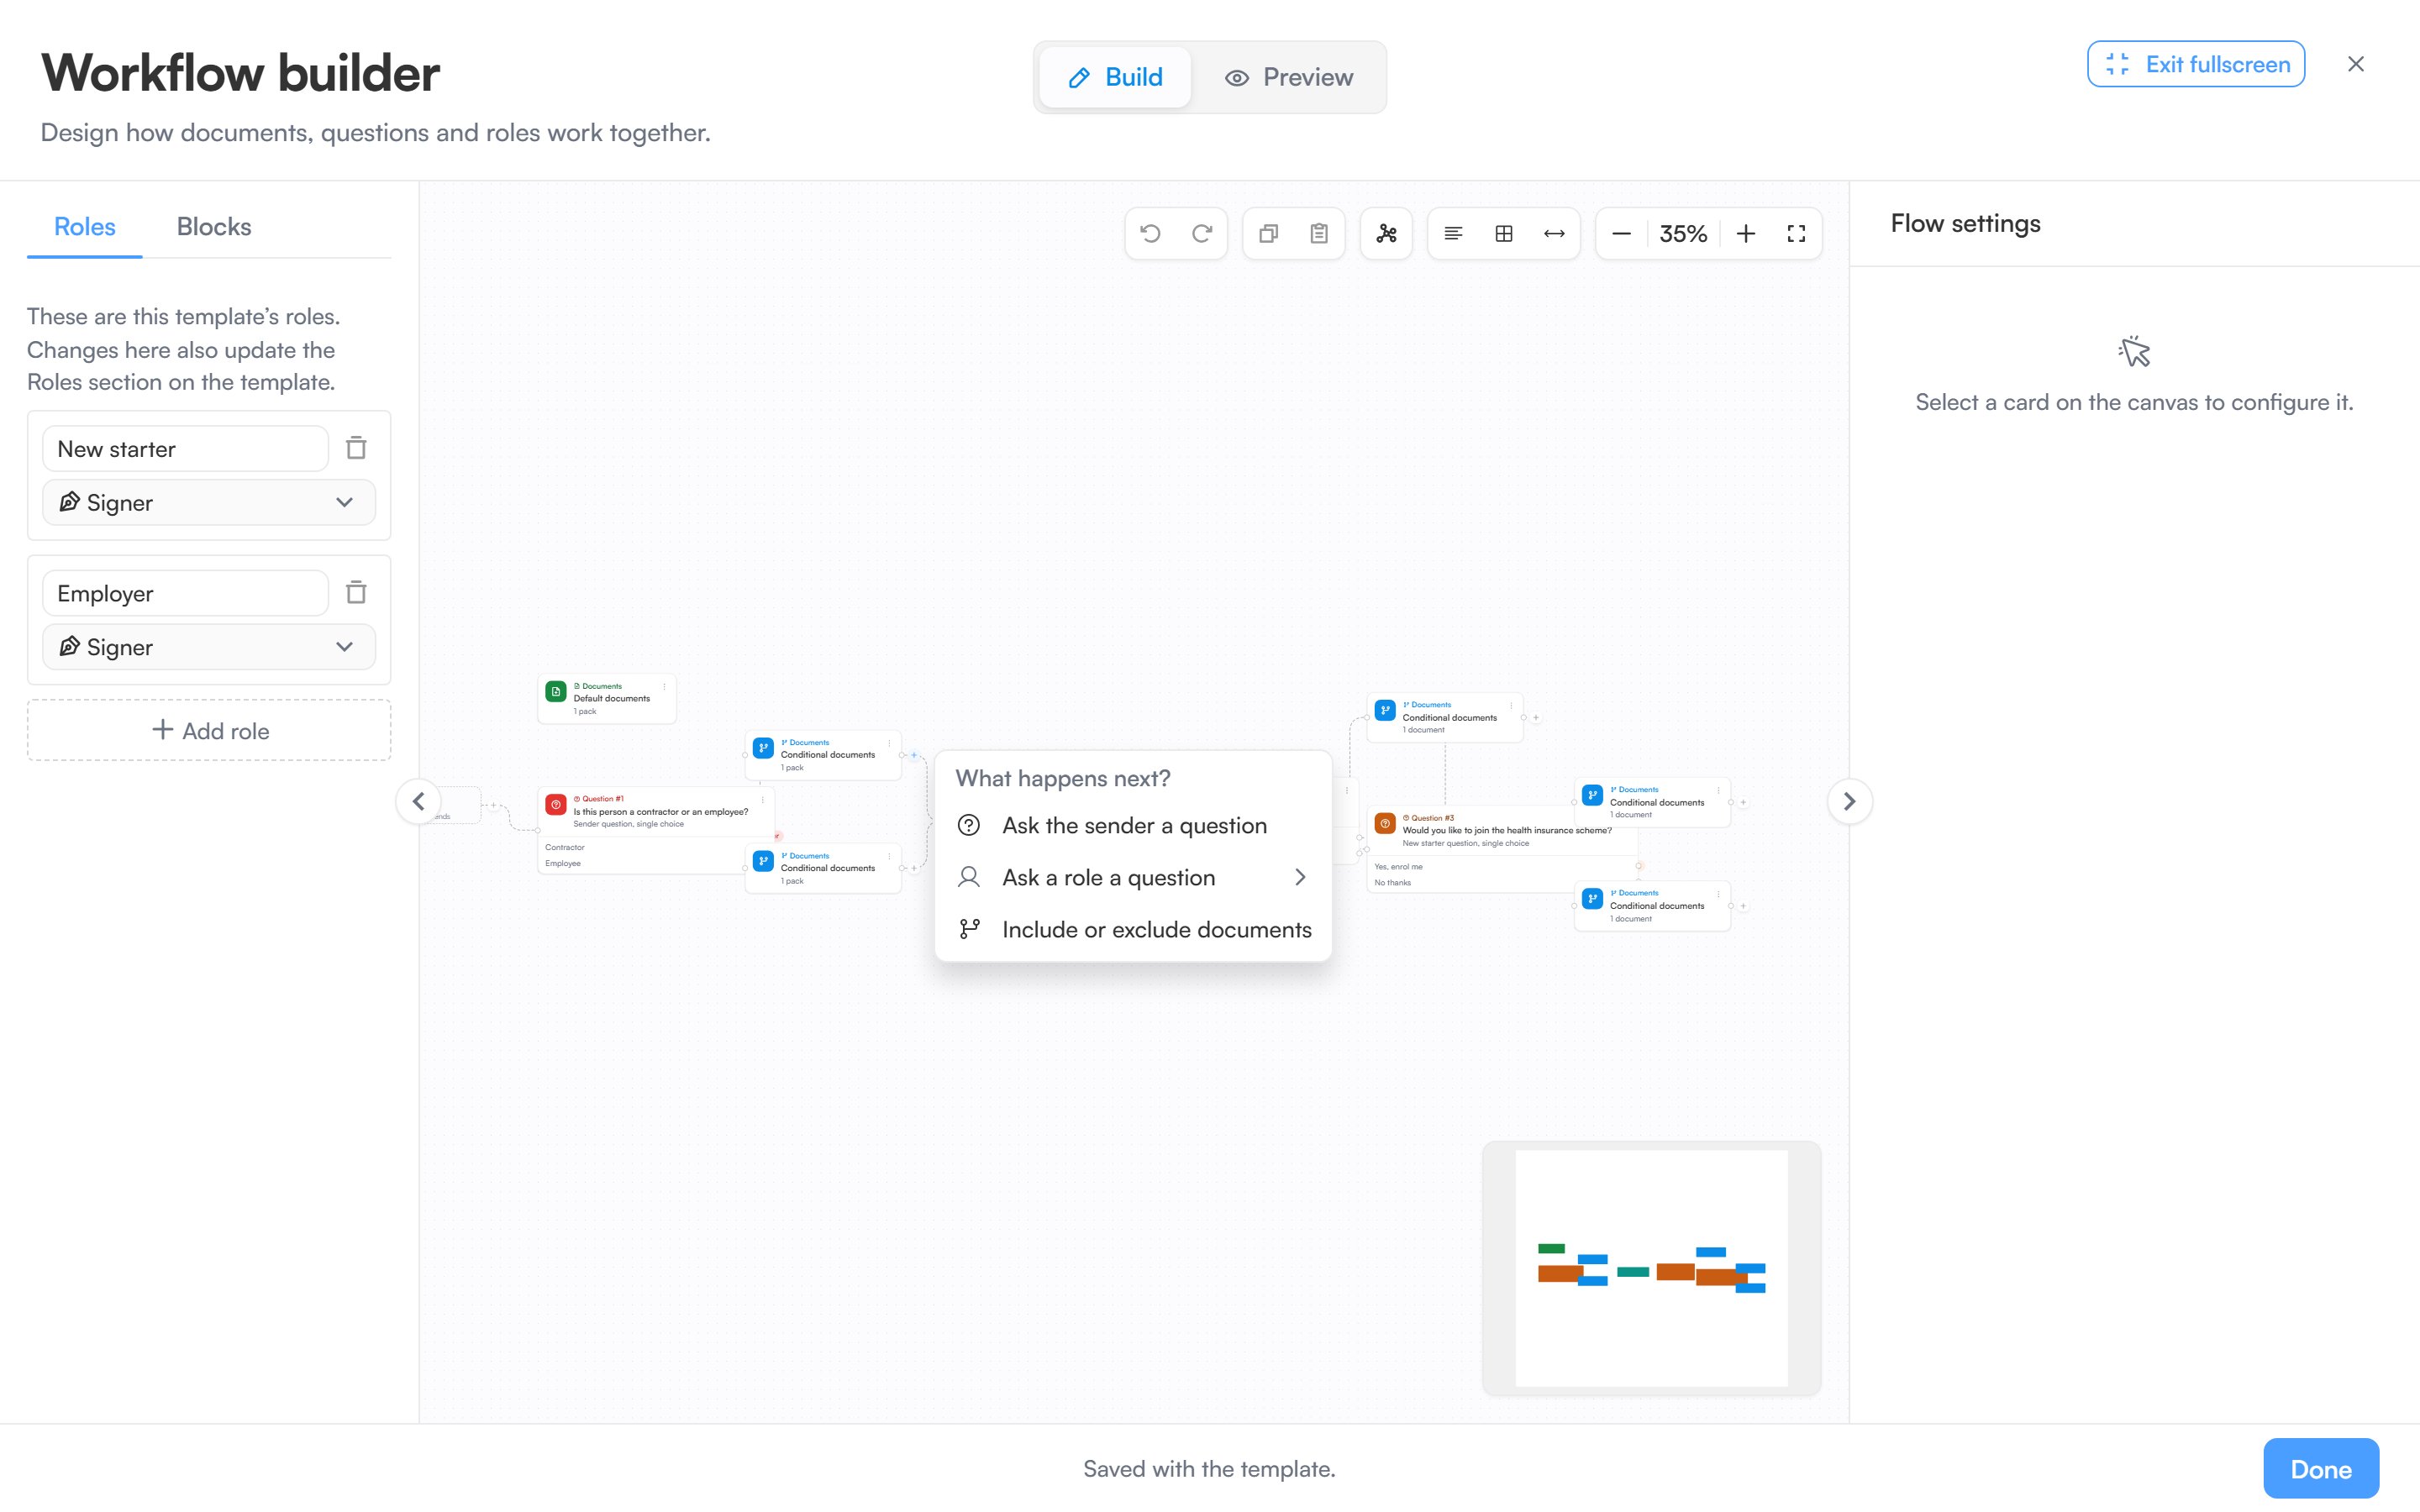 From the Start tile you can add a question or a role, plus **Documents that always go out** until the workflow has some. Conditional documents are added below another card, so an answer can decide what goes out.
### The blocks
You can also build by hand. The rail on the left has a **Roles** tab and a **Blocks** tab. The blocks are grouped:
| Block | What it does |
| --------------------- | ---------------------------------------------------------------------- |
| Default documents | Documents that are always part of the package |
| Conditional documents | Documents that depend on an answer |
| Question | A yes/no or multiple choice question, or an open text or number answer |
| Role | Who receives and signs at that point in the flow |
| Operator | AND, OR and NOT, or a numeric comparison |
If the template has dynamic documents with questions of their own, those questions also appear in the rail, ready to place on the canvas.
### Placing and wiring cards
Click a block to pick it up and then click the canvas to drop it, or drag it straight across. Press `Escape` to put it back. A block you have placed is a **card**.
Wire cards together by dragging from the dot on the edge of one card to the next. A question card has a connector for each of its answers, so dragging from one answer's dot sends that answer down its own path: wire it to a conditional documents card to say what that answer includes or drops. If every answer should lead the same way, turn on **All answers continue the same way** in the question's settings. Connections that would not make sense are refused with a message saying why.
The toolbar on the canvas has undo and redo, copy and paste, **Tidy the layout** (which straightens the whole flow in one pass), toggles for **Show conditions on cards**, **Snap to grid** and **Auto-shift downstream cards on resize**, plus zoom and **Fit to view**.
### Roles
The **Roles** tab in the rail edits the same roles as the template's **Roles and signing order** section, so a name changed in one place changes in the other. A role card on the canvas points at one of those roles. When the flow reaches it, that role is sent their link. Questions wired below it are theirs to answer before they sign, and roles wired below it wait for them to finish.
A document decided in a role's turn (below their card) can carry that role's fields, because they answer and then sign. It cannot carry fields for a role whose turn has already finished, since they have signed by the time it is decided.
Role cards are optional. A role with no card on the canvas still signs: once the workflow's role cards are done, those roles are sent their links one at a time, in the order of the roles list. Place a role on the canvas to give it a point in the flow instead.
### Editing a card
Select a card and its settings open in the panel on the right. Documents and question cards split their settings across **General** and **Advanced** tabs. Deleting a card asks you to confirm first, and removes the lines wired to it.
### Fix problems before you publish
When something is incomplete, the footer shows a red count of things to fix, and cards with a problem are outlined. Problems that were already there when you opened the builder stay quiet on the canvas until you click the count; new ones show as you work. Clicking the count jumps back to **Build** with the notes on the canvas, and **Show me** frames the cards involved.
A draft can hold a workflow with problems, so **Save draft** always works. While the template signs by a workflow, **Publish** and sending are blocked until the list is clear, and a published template cannot be saved with a workflow that breaks a rule.
### Preview it
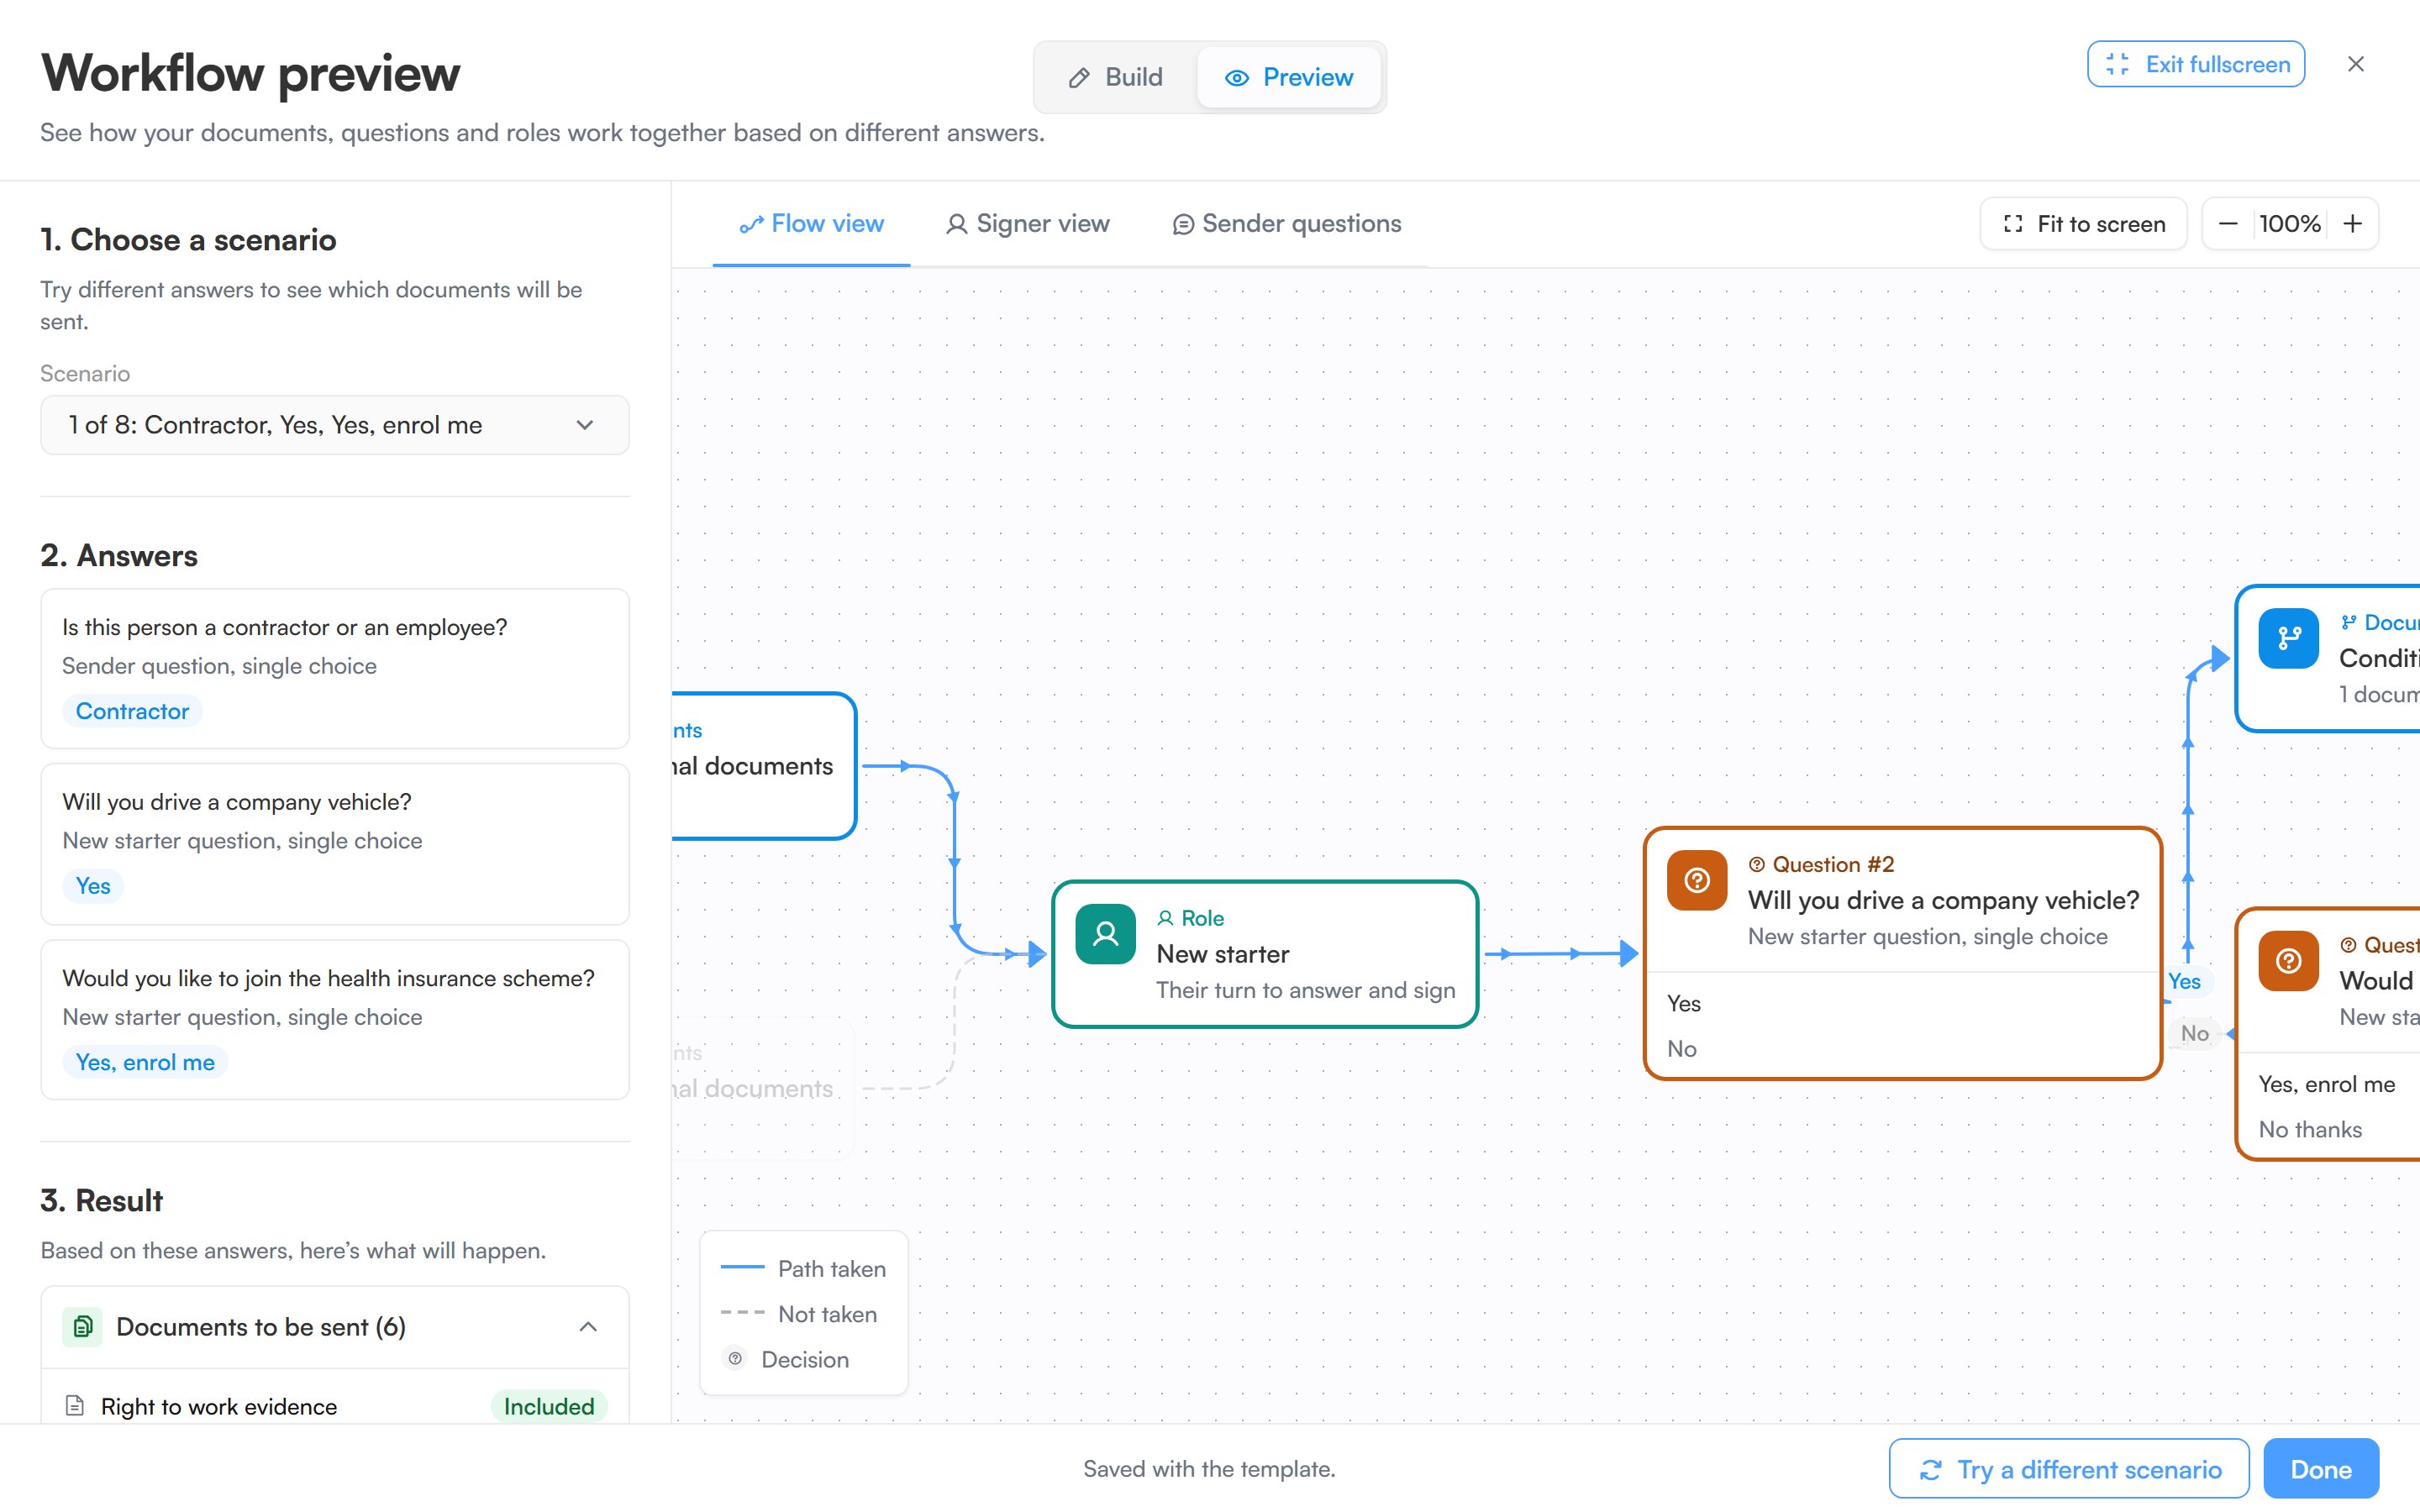
**Preview** runs the workflow against one set of answers. **Flow view** steps through choosing a scenario, the answers that scenario uses, and the resulting list of documents included and left out, with the path taken highlighted on the canvas. **Try a different scenario** in the footer moves to the next one. A legend explains the lines, and the canvas has its own zoom and fit controls.
From the Start tile you can add a question or a role, plus **Documents that always go out** until the workflow has some. Conditional documents are added below another card, so an answer can decide what goes out.
### The blocks
You can also build by hand. The rail on the left has a **Roles** tab and a **Blocks** tab. The blocks are grouped:
| Block | What it does |
| --------------------- | ---------------------------------------------------------------------- |
| Default documents | Documents that are always part of the package |
| Conditional documents | Documents that depend on an answer |
| Question | A yes/no or multiple choice question, or an open text or number answer |
| Role | Who receives and signs at that point in the flow |
| Operator | AND, OR and NOT, or a numeric comparison |
If the template has dynamic documents with questions of their own, those questions also appear in the rail, ready to place on the canvas.
### Placing and wiring cards
Click a block to pick it up and then click the canvas to drop it, or drag it straight across. Press `Escape` to put it back. A block you have placed is a **card**.
Wire cards together by dragging from the dot on the edge of one card to the next. A question card has a connector for each of its answers, so dragging from one answer's dot sends that answer down its own path: wire it to a conditional documents card to say what that answer includes or drops. If every answer should lead the same way, turn on **All answers continue the same way** in the question's settings. Connections that would not make sense are refused with a message saying why.
The toolbar on the canvas has undo and redo, copy and paste, **Tidy the layout** (which straightens the whole flow in one pass), toggles for **Show conditions on cards**, **Snap to grid** and **Auto-shift downstream cards on resize**, plus zoom and **Fit to view**.
### Roles
The **Roles** tab in the rail edits the same roles as the template's **Roles and signing order** section, so a name changed in one place changes in the other. A role card on the canvas points at one of those roles. When the flow reaches it, that role is sent their link. Questions wired below it are theirs to answer before they sign, and roles wired below it wait for them to finish.
A document decided in a role's turn (below their card) can carry that role's fields, because they answer and then sign. It cannot carry fields for a role whose turn has already finished, since they have signed by the time it is decided.
Role cards are optional. A role with no card on the canvas still signs: once the workflow's role cards are done, those roles are sent their links one at a time, in the order of the roles list. Place a role on the canvas to give it a point in the flow instead.
### Editing a card
Select a card and its settings open in the panel on the right. Documents and question cards split their settings across **General** and **Advanced** tabs. Deleting a card asks you to confirm first, and removes the lines wired to it.
### Fix problems before you publish
When something is incomplete, the footer shows a red count of things to fix, and cards with a problem are outlined. Problems that were already there when you opened the builder stay quiet on the canvas until you click the count; new ones show as you work. Clicking the count jumps back to **Build** with the notes on the canvas, and **Show me** frames the cards involved.
A draft can hold a workflow with problems, so **Save draft** always works. While the template signs by a workflow, **Publish** and sending are blocked until the list is clear, and a published template cannot be saved with a workflow that breaks a rule.
### Preview it
**Preview** runs the workflow against one set of answers. **Flow view** steps through choosing a scenario, the answers that scenario uses, and the resulting list of documents included and left out, with the path taken highlighted on the canvas. **Try a different scenario** in the footer moves to the next one. A legend explains the lines, and the canvas has its own zoom and fit controls.
 **Signer view** tests one person's experience. Pick a role, pick a scenario to set the answers given before that signer's turn, then answer the real pre-signing questions that role is asked. It then lists the documents the workflow includes for that role.
When the sender is asked questions, a **Sender questions** tab lists them in the order the sender answers them.
Signer view stops at the document list. Reviewing and signing the documents happens on the real signing page, not in the preview.
### Save
Click **Done** to close the builder and keep the canvas as you left it. Closing it another way with unsaved changes asks **Discard changes to this workflow?** The workflow is saved with the template, so finish the template's other sections and save the template to keep it.
Templates are the recommended way to send from code. `POST /api/v1/packages/from-template` creates a package from a template with recipients mapped onto its roles; see the [developer quickstart](/developers). The public API is included on the **Enterprise** plan.
## Troubleshooting
**A signer says they did not receive the email.** Ask them to check spam or junk. The package page shows whether their session has been sent and opened.
**A field is not showing for a signer.** Check which role the field is assigned to in the template. Only the recipient filling that role sees it.
**The template cannot be sent.** Make sure it has at least one document and one named role, and that it has been published. With Workflow signing, the workflow must also have nothing left to fix.
**Signer view** tests one person's experience. Pick a role, pick a scenario to set the answers given before that signer's turn, then answer the real pre-signing questions that role is asked. It then lists the documents the workflow includes for that role.
When the sender is asked questions, a **Sender questions** tab lists them in the order the sender answers them.
Signer view stops at the document list. Reviewing and signing the documents happens on the real signing page, not in the preview.
### Save
Click **Done** to close the builder and keep the canvas as you left it. Closing it another way with unsaved changes asks **Discard changes to this workflow?** The workflow is saved with the template, so finish the template's other sections and save the template to keep it.
Templates are the recommended way to send from code. `POST /api/v1/packages/from-template` creates a package from a template with recipients mapped onto its roles; see the [developer quickstart](/developers). The public API is included on the **Enterprise** plan.
## Troubleshooting
**A signer says they did not receive the email.** Ask them to check spam or junk. The package page shows whether their session has been sent and opened.
**A field is not showing for a signer.** Check which role the field is assigned to in the template. Only the recipient filling that role sees it.
**The template cannot be sent.** Make sure it has at least one document and one named role, and that it has been published. With Workflow signing, the workflow must also have nothing left to fix.